Wednesday, February 16, 2011

An Ode to PB-Pottery Barn Knock-Off Belgium Train Signs

Oh Pottery Barn how I long for thee,
I want your items, but it can't be,
I can make them for a fraction of the price,
They're not exact, but still very nice!

Update
I added some rope to my signs 
from my original post! 
 

These signs were soooo cute!!  I saw the pics and love love loved them!!

This is what theirs looks like:
And here is mine:
Mine cost $4!!!  The silly twig wreath was made from an old 8x10 pic frame, hot glue, zip ties, and twigs from my yard :)

  The twig wreath took a dive while I was puttying the cracked drywall and putting the rope up! :(

Make your like beautiful!  :)
-Kari

Tuesday, February 15, 2011

Master Bedroom Headboard

With a huge room it's a hard task to come up with something that is my style, is affordable and also takes up enough real estate in the room so it looks correct, but I think I accomplished it with my screen door/window headboard.

The before pic of our master bedroom:
This is what it looks like now, a little Ralph Lauren paint in Neutral Brown and some creativity!
I love how it turned out!!  Total cost $40 :)

Make your life beautiful :)

-Kari

DIY Pottery Barn Bellora Chandelier Knock-Off .... when you can't afford something, make it!

When we bought our new house the lighting was straight from the 80's...not knocking the 80's they did have some rockin' hair and of course I was born in that decade, but lighting has come a long way baby!
  I will remind you of what I had originally in the dining room:
See the tiny globe light and the terrible 80's ceiling fan all on the vaulted ceiling!
After staring at the lights I decided I was stuck and was going to need to call an electrician to move the lights where I needed them to be.... :(  (this meant dollars I didn't want to spend!)  Until mom genius mom, said, "Why don't you just swag the chandelier from the spot it's at to where you want it to be?"  A-MAZ-ING idea!!  I had never thought of that....had I looked in my master bath, maybe I could have come up with this one. (The pendant lights in there are swagged.)  But all credit goes to my mom!   Then the race was on to figure out what I wanted there.  I say race, we moved in at the beginning of September and I wanted pretty chandeliers right away by Thanksgiving.

So I started looking in my favorite place:
 I come up with the beautiful Bellora Chandelier:
She is breath-taking and bubbly!!  I wanted her, problem was I needed two and the are $299 each!!  I refused to pay thought that was a little high for my budget of, we just had a baby and bought a new house!

So I looked around some more.  I found this one from lightinabox.com :
Also, bubbly, but way to gold...fixable though with a can of spray paint.  Still to pricey $236!  Come on people!

So I decided, I can do this myself!

I checked on craigslist and visited my local Habitat for Humanity Restore (love this place) and came up with these beauties:
small chandelier (don't mind my messy garage)
large chandelier

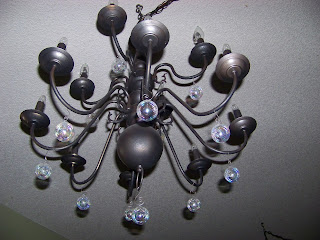
I paid $30 for the little one and $50 for the big one.  They got a few coats of flat black to start with and then a final spray of Rustoleum's hammered bronze :) Then she looked like this:
For some reason my complete lack of camera skills it looks more pewter, but it looks oil rubbed bronze in real-life :)

Then I had to come up with the tiny glass bubbles....called a local glass blower, he said it would be around $150, if he decided it was worth his time.  Called PB and asked to purchase replacement bubbles...they don't sell them.  I googled EVERYWHERE the only thing I could come up with were way to big or out of my price range. :(  On a trip to Hobby Lobby I perused the Christmas ornaments hoping that their was something similar and "Oh, what to my wondering eye would appear, but a tiny glass ball and eight tiny reindeer!"  I passed on the reindeer and grabbed 20, glass balls.  I could do $1.99 each, but it gets BETTER!  THEY WERE HALF PRICE!!!! So, I got them for $.99 each :)  I was so excited I called my mom at work to tell her....she's was excited for me, but had a tone of "my daughter-might-need-to-be-committed" in her voice.  She may be right, but that brought my total for BOTH chandeliers to: buh,buh,buh,buh,buh (that's a drumroll) $110 including paint and hardware for hanging!!!

They look like this now:


-Make your life beautiful!
Kari

Thursday, February 10, 2011

Inspiration for the Front Bathroom!!

Oh the choices I have :)....unfortunately, I am in a constant state of crazy!!  But, I have decided on a design for our little front bathroom!

I have completed the following:
1. Primed and painted all the old trim and the back of the door.
2.  Decided midway through painting the trim to scrape the popcorn ceiling off.  (apparently, this is extremely dirty and dusty, but I'm glad I did it before I worked so hard to paint it!!  I did this without a mask.  Not cool, Kari, not cool!!  I had dust boogers and could smell drywall dust for 3 days!
3. Painted the ceiling
3 1/2 .  (Forgot I did this) puttied all the old holes and sanded them flat to the wall
4. Painted the walls white
5. Eagerly tediously measured and taped off the stripes
6.  Impatiently waited to pull of all the tape it took me 2 hours to do :)
7.  Ripped the tape off and admired my work!!
8. Installed (Okay, Colin did it and I handed him tools) installed a new curved shower curtain rod

Things left to do:  fingers crossed I think this will all get done during Spring Break
1. Tile the floor (already have the tile from a project that didn't get completed at our old house) Woohoo, no new costs!
2.  Install the new bathroom vanity I scored at Home Depot...was $450, got it for $150!  I had admired it for a while and heard they were having a paint sale (half price Ralph Lauren paint)  and they were getting in new vanities and this was marked down!
3. hang the new mirror-scored on Craigslist for $20
4.  Install the towel hooks Mr. TSL is making for the girls
5.  Install the new light and exhaust fan w/light  (Hayley told me when we moved in she didn't like showering in their because it was too dark!)
6. Accessorize.... I think I have almost everything.  I've got 2 small projects for a beach sign and a large wooden seahorse to hang above the toilet.


Here is my inspiration for the bathroom:
This is the reading room created by Layla and Kevin Palmer over at theletteredcottage.net  (Check them out, they are AMAZING!!)  Eventually I will learn how to make a button, so you can just click a word in my blog and it will lead you to their posts!   Until then, google them!


The next is something similar to that with the horizontal stripes.  It was designed by the Sherry and John over at younghouselove.com .  Again google them they are astounding at making something fabulous on a budget!


I am planning on making a seahorse like this one to hang above the toilet:
The bathroom vanity looks similar to this:  (I think this one is black, ours is espresso)


I will post pictures of my progress when I figure out the camera....the button is pissing me off stuck. :( A new camera would be amazing!!

Kari

Tuesday, February 1, 2011

The before pictures.....

These are the mallard-rific before pictures of our new house, WAY before we got a hold of it.  I claim no credit for any of the decor.  :) Everyone has their own style and I would say this is country-mallard!

Outside of the house:


A grand tour of the inside:  :) This is the living room, from the far corner. (The front bathroom is located in that corner and now the piano lives in that corner too.) 

 This is the living room as you walk in the door...  yes that awkward pole is load bearing :(
 This is the area we use as the office:


This is the bathroom that is located off the living room. 

Now on to the kitchen:  It's up the 4 steps off the office area...yes they are carpeted and trimmed with gold carpet strips.  To top it all off the walls going up the steps are carpeted as well...you should see me try to vacuum that! :)


 The dining room is on the other side of the island:  (Yes, that is a giant fishing pole!!  We live right by the lake.)


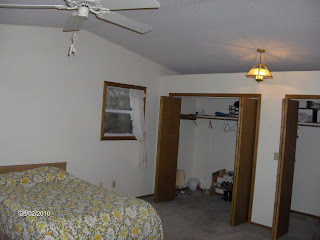
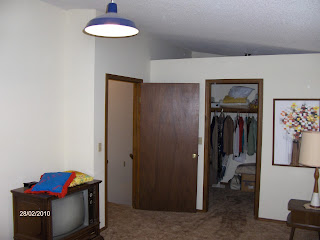
The master bedroom and closet...I mention the closet because it's bigger than the girls bedroom at our last house!!


One of the added treasures to this house was all the gnomes.  I know you are currently re-reading that, I said gnomes.  There is statuary everywhere....everywhere.  It is all over our 5 acres.  I have even found it up in a tree, it is a fake squirrel.  I think to myself is it there to scare away other squirrels or just so if you haven't seen a squirrel in  a while there is one to look at ALWAYS.  We collected all of them and I will post a pic of that later in spring :)  My favorite was Snow White and all 7 dwarfs on our hot tub in the sunroom :)

Master Bathroom:


This is Morgan's room (She got the smaller one because Hayley wanted to share her room with our new baby, Audrey!)

Hayley and Audrey's room:  (Audrey will be in our room until she can sleep in a big girl bed and make it up and down the stairs without inducing a panic attack for me!)


Last, but not least.....the sunroom :)


Yes that is a concrete horse...not a pet!  We actually have 3 of these, they are 3 feet tall and VERY VERY HEAVY.  Just ask Mr. TSL, he picked them all up to move them!

Monday, January 24, 2011

Testing testing....1 .....2.....

Hello world!  I am excited to have my very own blog!  That's right I have jumped into this century :)  My poor brain goes 900 mph all the time with decorating ideas!  I feel the need to get them out, so others can do them and so I don't forget them!  I have 3 beautiful daughters and a wonderful husband, whom I adore!  I am a teacher, who should actually be a decorator!  I took the year off to welcome our new daughter Audrey to the world.  Her big sisters Morgan and Hayley were so excited when she arrived.  Between getting ready for school, caring for a newborn and gymnastics I try to find the time to decorate and redo our new house! My poor husband is riddled with random projects I come up with and he dives into them like a champ when he gets a chance :)