I finally got around to changing it a few weeks ago..I know, I know, I could have shared this idea with you a few weeks ago, but life has been crazy around here!! The kids are out of school and momma isn't getting her blog on as often!
I made this PB Knock Off Lantern out of old picture frames!!!!
It was inspired by these lanterns from Pottery Barn:
| Pottery Barn Gothic Lantern |
| Pottery Barn Blacksmith Taper Lantern |
I was going to make a lantern from old picture frames!!
Don't worry I got Audrey out of the bath before I started all this!!
Here's how it was made:
Step 1:
 |
| Can you guess which one broke?!? :) |
Step 2: Collect your supplies. I used hot glue, gorilla glue, a speed square, needle nose pliers, and painters tape!
 | |
| Apparently I didn't picture all my supplies-ADD kicking in! |
Step 4: Use your speed square or other 90 degree angle tool to keep it square and put on the Gorilla Glue, then quickly shoot some hot glue on the ends, just to keep it in place. I'm sure there is an easier way, but I try to look for the hardest way possible and do it that way. I usually open packages and then find the easy 'pull here to open it' spot!
 | |
| Sorry it's blurry! |
Step 6: Tape around the sides with painters tape to keep it together while the glue dries. When all sides are done, you should have something like this.
 |
| Yes, that's the grout stirring paddle in the background! |
Step 7: Find some light source to donate it's guts to your new lantern! I picked this one up from H4H for $5.
Step 8: Forget to take all pictures for the rest of this blog...sorry!
After I took the H4H light apart I attached eyelet screws on the corners of my frame cube and ran chain I had from a previous project (like 3 years ago) from the eyelet screw to the ring on the top of the H4H light. Spray painted it all black and had it sit for like 2 weeks before I picked up the wire nuts, so Mr. TSL could hang it.
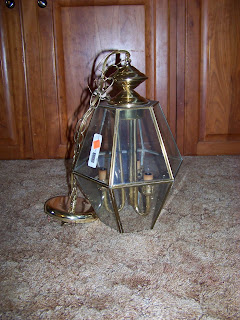
Here is the light that was there before: GAG!!
And Now:
-Make your life beautiful!
| Adiamond in the Stuff |
| Coastal Charm |


So creative! Love the Mr and Mrs above your closets.
ReplyDeleteoh my gosh this is brilliant...
ReplyDeleteWould luv for our readers to discover this.
please add it to our linking party here
http://www.passionatelyartistic.com/2011/06/beautiful-furniture-redo-pop-up-cards.html
Have a great week,
Maggie
http://passionatelyartistic.com
A very clever idea! It looks just as good, if not better, than the one at Pottery Barn! Lesa
ReplyDeleteSuch a great idea!!! Thanks so much for linking!
ReplyDeleteI would love to see this at my party.
ReplyDeleteI am just reminding everyone about tonights link party that runs Friday evening through Mondays!
I also have an ongoing give away link party now too.
Hope to see you soon.
http://bacontimewiththehungryhypo.blogspot.com/
come strut your stuff
You. Are. Brilliant. Seriously!!! I'm going "WOW". :) Where in my house can I do this........
ReplyDeletehttp://kammyskorner.blogspot.com
Very cool...love it!
ReplyDeletethis is great!
ReplyDeleteThis is a fun idea! I would love to have you come to Remodelaholic to do a guest post about this. If you are interested would you please let me know? And I will get you all the details!
ReplyDeleteThanks,
Casstiy
So cute, love it!! It looks like this a very requested post ;) and no wonder, it is brilliant! We would love to have you link up with us too, our link up party starts tomorrow!! Hope to see you there :)
ReplyDeleteBritney
www.jandmseyecandy.blogspot.com
You are a genius. Nothing less then a genius. Great idea. Looks so good. Love the Mr and Mrs sign above the door too!!!
ReplyDeleteWow, this is VERY clever...love it!
ReplyDeleteI am so impressed by your creativity...I would have never thought about using picture frames!! Great work!
ReplyDeleteThanks so much for linking back to my site too...it's so appreciated :)
I featured this today on my blog...come grab a "featured" button! http://christinasadventures2010.blogspot.com/2011/06/sunday-features-26.html
Too cute! And wow thats a ton of parties girl. How do you find time for anything else!?
ReplyDeletelove this! and the Mr. & Mrs :)
ReplyDeleteLoved your post so much I featured you this week at my Weekly Link Party
ReplyDeleteFeel free to stop by and grab a button!!
xoxo
Allison @ <a href="http://www.houseofhepworths.com/>House of Hepworths</a>
Thanks for linking up at the Creative Bloggers' Party & Hop. Just letting you know that I've pinned this in Pinterest and featured it today here. Please feel free to grab the feature button on my sidebar :)
ReplyDeleteGenius!!! Love it!! I am visiting from Tatertots and Jello and I am a new follower!!! I would love if you would come by my blog today or tomorrow morning and link this up to my Delicately Constructed party!!
ReplyDeleteHope you have a great weekend!
Michelle
www.delicateconstruction.blogspot.com
Kari- I think I am going to try this with my foyer lights! I can't stand them and was telling Hubs the other day I was thinking of spray painting them, but this removes the whole worrying about getting the glass with the spray paint thing...clever, clever, girl!;) Thanks for the tip!!!!!!!!
ReplyDeleteGenius!
ReplyDeleteGreat job on your lamp - what a cool idea! I have this linked to my lamps & lights post too today, well done!
ReplyDelete