Pages
▼
Tuesday, March 26, 2013
Wednesday, March 13, 2013
coming to terms with a popcorn ceiling
I despise popcorn ceilings. Loathe them. But, it is the hand that has been dealt.
I have been talking about planking the ceilings....all of them. We have vaulted ceilings and a lot of space to be covered.
After taking into consideration the magnitude that would be this process (mainly Mr. TSL's face when I talk about redoing all the ceilings and my mom telling me just to get over them and stop looking at them) I have decided to just deal with them.
Seriously with 4 kids and the giant ass mess scraping them would cause, what was I thinking. I have better things to do with me time, like read other people's blogs about how they scraped theirs and looking at planked ceilings on Pinterest!
I have researched a few alternatives.
Paint it white, then it looks clean and fresh and gets rid of the little shadows caused by years of cobwebs :)
Paint the whole room including the ceiling the same color.
I know this is a stretch, but I really like this....paint it darker. It's bold and kind of sexy :)
I think I am going with the middle one of painting it to match the walls.....I don't want to be safe and go with the white ceiling, but I don't have the balls to paint it darker. I just wouldn't want to climb on the ladder to repaint it if I didn't like it.
We'll see. Until then, here is also a good tip of you have to repaint your popcorn ceiling.
xoxo

I have been talking about planking the ceilings....all of them. We have vaulted ceilings and a lot of space to be covered.
After taking into consideration the magnitude that would be this process (mainly Mr. TSL's face when I talk about redoing all the ceilings and my mom telling me just to get over them and stop looking at them) I have decided to just deal with them.
Seriously with 4 kids and the giant ass mess scraping them would cause, what was I thinking. I have better things to do with me time, like read other people's blogs about how they scraped theirs and looking at planked ceilings on Pinterest!
I have researched a few alternatives.
Paint it white, then it looks clean and fresh and gets rid of the little shadows caused by years of cobwebs :)
| via |
Paint the whole room including the ceiling the same color.
| via |
I know this is a stretch, but I really like this....paint it darker. It's bold and kind of sexy :)
| via |
We'll see. Until then, here is also a good tip of you have to repaint your popcorn ceiling.
| drag a flathead screwdriver along the edge to get a better paint line :) |
xoxo
Thursday, March 7, 2013
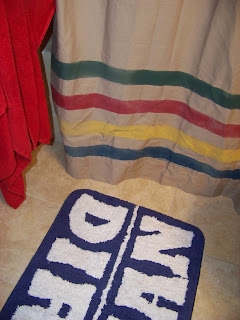
DIY: Pendleton Shower Curtain
I've actually been rocking some kick ass projects out....just need to show them to you!
Sorry if these pics suck, my editing stuff has decided to stop working. Boo.
I have finally discovered my style!! While I love many styles, the one that catches my eye most are industrial and glamping-type decor (glamourous camping). I combine the 2 and have deemed it "INDUSTRIAL GLAMPING" :)
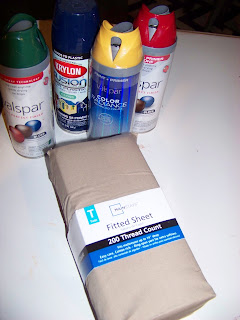
I used a tan flat sheet from Wal-Mart $5, some spray paint and frog tape :)
xoxo

linked up at East Coast Creative here
Sorry if these pics suck, my editing stuff has decided to stop working. Boo.
I have finally discovered my style!! While I love many styles, the one that catches my eye most are industrial and glamping-type decor (glamourous camping). I combine the 2 and have deemed it "INDUSTRIAL GLAMPING" :)
I used a tan flat sheet from Wal-Mart $5, some spray paint and frog tape :)
please note I bought a fitted sheet, had to go back and get the flat one....
This bathroom is hard to photograph, but here are some more pics:
rug from UO found here
diy seahorse found here
I also painted this little wooden box that I picked up for like $2.50ish I think-it was on sale at the Hobster Lobster (hobby lobby) It stores all the bandaids and first aid stuff-neosporin, gauze, thermometer, some colored pencils. The colored pencils are Audrey's, just in case of an emergency!!
Remember when I redid the bathroom almost 2 years ago (here), then I decided that since it's the kids bathroom it needed a little color-red. (here)
Well, I chose the vanity quickly one day while it was on sale. It sat in our garage for about 3 months until we got to the redo....it was a super shitty cheap crap vanity and I didn't realize it until it was too late. I loved the sink, but the base is pressed wood junk. It almost immediately began to scuff/chip off. Leaving it looking like this.
Which super pisses me off...the first few scuffs/chips I just took a brown sharpie to them. It worked for like a week and then there were more. Suckola! Mr. TSL is going to build us one from real wood eventually, but until then I'm not staring at this crap! So, the beginning of next week it's getting sanded and painted! Temporary fix, but I'm super sick of looking at it!!
It's come a long way from this:
linked up at East Coast Creative here


