Showing posts with label lighting. Show all posts

Friday, October 4, 2013

Large Red Lantern for $15

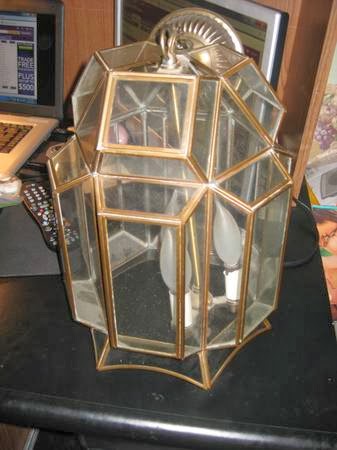
Remember when I scored this lantern from a thrift store for $10.  It started out freaking fugly, but it had potential.  It was so damn heavy and I immediately got to work on it.  Yes, I had other crap going on, but come on.  

All the glass was in great shape and was beveled.  It was going to be a total bitch to tape it all off and try to get the spray paint in all the nooks and crannies.  So, with my super arm strength I held it above our dumpster and took a hammer to the glass.  I bet my neighbors think I'm nuts.  I was doing it and my mr. came running out of his garage to see what was wrong.  Nothing just breaking some glass.  He didn't even flinch, just nodded and went back to working.  It's not uncommon for me to do something crazy.

I haven't decided if I love it red or if it will eventually be black, but here she is:


Remember the before:

One more after for you from the other direction:


Yesterday I scrubbed the top cabinets, took the doors off, and taped the cabinets in preparation to paint the top cabinets white!  I also sprayed the hinges white.  Can't wait to show you pictures soon!

So, what do you think black or red lantern.  If I leave the lantern red, do I repaint the back door black?  I am currently painting all the doors black room by room, so it would make sense.  

xoxo


Tuesday, October 1, 2013

old light made new with a neon pink duct tape & gold ceiling dots

My hilarious friend Jess moved in to a new apartment a while ago and she has been slowly been making it hers.  It's super cute guys.  Seriously.  So cute!

Anywho, she recruited me for my super good looks and mad skills....kidding I do have mad skills in making cool stuff for cheap!  So, we have been working on some stuff.

Scored this light from craigslist, it's brass and old and awesome.


I cleaned it up and it was lovely.  But, it needed to be a plug in light and the light bases were falling apart.  In steps some glorious neon pink duct tape.


Now, I am going to teach you how to rewire a chandelier to make it plug in.
It's super easy...I may be plotting to do this to a few lights. Don't judge.

DISCLAIMER: I am not an electrician. I did this myself.  I am telling you how I did it.  I am in no way responsible if you fuck yours up and burn down your house.  

REWIRING A CHANDELIER

1.  Collect your supplies: chandelier, wire strippers, needle nose pliers, a lamp kit from Lowe's (for the switch), electrical cord for your needed length, duct tape to cover the cord when finished, and electrical tape (it's must be electrical tape, no duct tape won't work for that part)


2. Cover the light bases with duct tape. 


3. Cut cord to decide where you need the switch.  You may skip this part if you don't need a switch.  Her plug was behind a bookcase and we needed it to be able to be turned on without having to plug it in every time.  Pull apart the wires with some pliers and wire strip the ends.


  4.  Join the ends together by twisting them like so, it doesn't matter which side you connect it to, just keep each side of the cord separate.


5.  Now tape each exposed wire with electrical tape.  You are going to be super excited at this point.  After each connection has been made, (I had to do it in 4 spots) and all the electrical tape is on PLUG IN THE LIGHT!!!  Do not wrap in duct tape until you have plugged it in.  If it doesn't work you are not going to want to undo all the duct tape.  I luckily thought of this ahead of time.  


6.  Sit back and realize how cool you are, text your friend pictures of her light.  Seriously. Awesome. 
Now recruit someone to assist you (I made Morgan and Hayley help hold it, child labor is free, woot woot!)
and cover the cord in duct tape.  I didn't get a pic of this step because all the hands were holding the cord so the tape didn't get covered in Harley's dog hair!

Before I show you the finished product, I have to show you one more addition to this light for her dining room.  My mom bought 2 packs of these dots at a garage sale, each pack had 4 sheets of dots.

I spray painted the dots gold and..............drum roll..................


It turned out so amazing!!  

Plus the Brass Folding Ghost Chairs I found on Craigslist found a home at her place.  They are perfect for her house!


We are also working on her bar cart and this gallery wall, she has to finish up her TV stand to make sure it doesn't conflict with the height of the art. :)
henry the pug wants you to know only you can prevent forest fires and he'll eat the rest of that if you are done with it.


xoxo

Wednesday, July 20, 2011

New Porch Lights!

We have had these up for 2 weeks now and I am just getting around to telling you!
When we moved in I almost immediately started replacing the outdated lighting.
I DIY'd some Pottery Barn Bellora Chandeliers, I DIY's some Blue Mason Jar Pendant Lights and have also replaced others...more on that later.

A few weeks back we had a reunion hosted at our place and I loathed the lights outside on the porch. I also hate the very gold brass handle and kick plate on the screen door!!  I'll have to deal with that later!  
I mentioned the light loathing to Mr. TSL and he asked that this be the light he was in charge of choosing.  
He has good taste, so this wasn't an issue.  He did marry me after all :)  Cost however, was an issue.

He showed me these lights from Barn Light Electric.
100W Atomic Cast Guard CGU Sconce, 96-Galvanized, Ribbed Glass


Love them, but with a price tag of $189.00 each---not happening!!  We need 2 and for $378, I could redo an entire bathroom...see that here :)

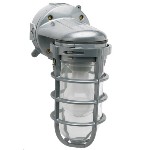
So, we set out to find similar, but way cheaper and did we ever!!  Over at Hardware World the Coleman Cable Industrial Light for $17.77!!!

Sold!!  Plus, it was in Kansas City, so it was super close and only took 1 day to get here!!

Before both lights:
After Both Lights:
sorry pic is blurry

Close up before:


Close up after:
Not too shabby for under $40!!

-Make your life beautiful!!


  SUNDAY:
The Girl Creative ,
The DIY Showoff,
Sisters of the Wild West,
The Tattered Tag,
Flamingo Toes,
Under the Table and Dreaming,
I Heart Nap Time


 MONDAY:
Skip To My Lou,
Thrifty Decor Chick,
C.R.A.F.T.,
Sew Can Do,
Dittle Dattle,
Between Naps On the Porch 
Homemaker on a Dime
Making the World Cuter
TUESDAY:
Tip Junkie,
Type A
A Bowl Full of Lemons
WEDNESDAY:
Blue Cricket DesignNot Just A Housewife
Today's Creative Blog
Handy Man, Crafty Woman
THURSDAY:
My Repurposed Life
Paisley Passions
House of Hepworths
Beyond The Picket Fence
The Shabby Chic Cottage,
FRIDAY:
Fingerprints on the Fridge
Miss Mustard Seed
SATURDAY:
Funky Junk Interiors


 , , , Funky Polkadot Giraffe, Extreme Personal Measures, , Someday Crafts, Sew Much Ado, Domestically Speaking, , Organize Your Stuff Now, , ,  , Seven Thirty Three, Just a Girl, Beneath My Heart, , Brandy's Crafts, Finding Fabulous, , ,, ,, 


Monday
  craftThe Graphics FairySumo Sweet Stuff Boogieboard CottageBecolorful Making  
Tuesday
PhotobucketStrictly Homemade Tuesday My Uncommon Slice of Suburbia Anything Related LINKPARTYBUTTON
 

Wednesday
a beach cottageDragonfly Designs Creations by KaraThe Trendy Treehouse
NightOwlCraftingShow and Tell Green  

Thursday
giveawaysMy Repurposed LifeTransformation Thursday A Little Knick KnackBeyond The Picket FenceHouseofHepworths
It's a KeeperSuzy's Artsy Craftsy Sitcom  

Friday
Furniture Feature FridaysmonogramBubbly Nature Lovely Crafty HomeTidy Mom I'm Lovin It Fridays Chic on a Shoestring DecoratingCraft GoodiesPhotobucketTickled Pink at 504 Main Designer GardenStuff and Nonsense  
BLOG TITLE


Saturday
Funky Junk's Saturday Nite Special

Sunday
UndertheTableandDreaming The DIY Show Off