Showing posts with label Chandelier. Show all posts

Friday, October 4, 2013

Large Red Lantern for $15

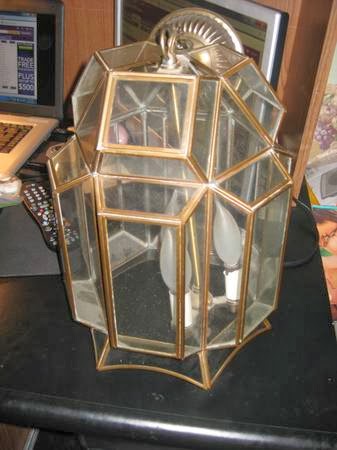
Remember when I scored this lantern from a thrift store for $10.  It started out freaking fugly, but it had potential.  It was so damn heavy and I immediately got to work on it.  Yes, I had other crap going on, but come on.  

All the glass was in great shape and was beveled.  It was going to be a total bitch to tape it all off and try to get the spray paint in all the nooks and crannies.  So, with my super arm strength I held it above our dumpster and took a hammer to the glass.  I bet my neighbors think I'm nuts.  I was doing it and my mr. came running out of his garage to see what was wrong.  Nothing just breaking some glass.  He didn't even flinch, just nodded and went back to working.  It's not uncommon for me to do something crazy.

I haven't decided if I love it red or if it will eventually be black, but here she is:


Remember the before:

One more after for you from the other direction:


Yesterday I scrubbed the top cabinets, took the doors off, and taped the cabinets in preparation to paint the top cabinets white!  I also sprayed the hinges white.  Can't wait to show you pictures soon!

So, what do you think black or red lantern.  If I leave the lantern red, do I repaint the back door black?  I am currently painting all the doors black room by room, so it would make sense.  

xoxo


Tuesday, October 1, 2013

old light made new with a neon pink duct tape & gold ceiling dots

My hilarious friend Jess moved in to a new apartment a while ago and she has been slowly been making it hers.  It's super cute guys.  Seriously.  So cute!

Anywho, she recruited me for my super good looks and mad skills....kidding I do have mad skills in making cool stuff for cheap!  So, we have been working on some stuff.

Scored this light from craigslist, it's brass and old and awesome.


I cleaned it up and it was lovely.  But, it needed to be a plug in light and the light bases were falling apart.  In steps some glorious neon pink duct tape.


Now, I am going to teach you how to rewire a chandelier to make it plug in.
It's super easy...I may be plotting to do this to a few lights. Don't judge.

DISCLAIMER: I am not an electrician. I did this myself.  I am telling you how I did it.  I am in no way responsible if you fuck yours up and burn down your house.  

REWIRING A CHANDELIER

1.  Collect your supplies: chandelier, wire strippers, needle nose pliers, a lamp kit from Lowe's (for the switch), electrical cord for your needed length, duct tape to cover the cord when finished, and electrical tape (it's must be electrical tape, no duct tape won't work for that part)


2. Cover the light bases with duct tape. 


3. Cut cord to decide where you need the switch.  You may skip this part if you don't need a switch.  Her plug was behind a bookcase and we needed it to be able to be turned on without having to plug it in every time.  Pull apart the wires with some pliers and wire strip the ends.


  4.  Join the ends together by twisting them like so, it doesn't matter which side you connect it to, just keep each side of the cord separate.


5.  Now tape each exposed wire with electrical tape.  You are going to be super excited at this point.  After each connection has been made, (I had to do it in 4 spots) and all the electrical tape is on PLUG IN THE LIGHT!!!  Do not wrap in duct tape until you have plugged it in.  If it doesn't work you are not going to want to undo all the duct tape.  I luckily thought of this ahead of time.  


6.  Sit back and realize how cool you are, text your friend pictures of her light.  Seriously. Awesome. 
Now recruit someone to assist you (I made Morgan and Hayley help hold it, child labor is free, woot woot!)
and cover the cord in duct tape.  I didn't get a pic of this step because all the hands were holding the cord so the tape didn't get covered in Harley's dog hair!

Before I show you the finished product, I have to show you one more addition to this light for her dining room.  My mom bought 2 packs of these dots at a garage sale, each pack had 4 sheets of dots.

I spray painted the dots gold and..............drum roll..................


It turned out so amazing!!  

Plus the Brass Folding Ghost Chairs I found on Craigslist found a home at her place.  They are perfect for her house!


We are also working on her bar cart and this gallery wall, she has to finish up her TV stand to make sure it doesn't conflict with the height of the art. :)
henry the pug wants you to know only you can prevent forest fires and he'll eat the rest of that if you are done with it.


xoxo

Thursday, May 23, 2013

thrift store score: giant lantern

sometimes when you go to a thrift store or the g-dub (goodwill) you find nothing.  other times you score big, like when i scored these chairs.

this is a score story.  i sold some crap off craigslist and was meeting the lady to deliver it and also had 6 trash bags of donate.  yes, i said 6 and no that isn't even half of what needed to go....that's all i had room for in the car.  anywho, the g-dub i usually go to was way across town so i stopped by a salvation army and dumped my stuff there.  i wasn't going to go in, but audrey and oliver were being good, so in we went.  i was walking around, got some random goodies.  i always go through the toys, baby clothes, picture frames and household stuff.

i walk by the furniture, some decent, nothing saying "kari take me home, stick me in your garage and pretend you have the time to redo me!"  then i saw it over by the lamps....a huge freaking lantern.


it's 30 inches tall and 17 inches wide!!  i swear it weighs like 15 pounds!
it's going to be red and hang over my kitchen island.  i hope to have it done in a week or so!

now some inspiring lantern pictures.....


images via pinterest

xoxo

Tuesday, June 28, 2011

My dining room....is getting there! plus the befores

Yesterday, I showed you my dining room, but blogger wouldn't let me load stuff and after an hour I just posted what I had gotten done on the post.  So, today I finish the post!

Plus, I didn't tell you......  the Grocery sign is made from the inserts in your dresser designed to keep your clothes from falling to the underneath drawer!!

I totally forgot to show a pic of the dining room before and then an after so you can compare.  Blogger was being a booger for me, so I didn't make the list of crap I had done either.  :)  So here we go!

Dining Room
before
This is the pic before we bought it.

A similar view, but after :)

Another before

Another After :)
look closely and you can see I haven't painted the kitchen area yet!
One last before

And My lovely after:
Okay my list of stuff we've done:
1.  Painted it green-decided I didn't like it and repainted Ralph Lauren Cobblestone which is my go to neutral color (LOVE IT!)
2.  Painted all the trim white-it was an orangey golden oak color-YUK!
3.  Yanked up all the carpet-for now we are living on subfloors and my Pier 1 rug that is too small for under the table.  It's way better than someone's dirty carpet.   Plus, way easier to clean up spills-it is a dining room after all. 
4.  Made some art for the walls-more on that later.
5.  Hung the kid's art gallery wall
6. Replaced the crappy misplaced fan and weird bug filled globe light with my Pottery Barn Knock-Off Chandeliers.
7.  Redid some freebie stools my mom scored me from her apartment that were getting thrown out!
8.  Got bamboo blinds from Payless Decor


Remember when I talked about my green chair inspiration.  Well, I am hoping to have some headway with that project soon!

I am currently working on all my dining chairs.  I scored these chairs from H4H (Habitat for Humanity) for $2 each during their Memorial Day Sale.

I actually already had 2 from a while back, so I have 10 matching dining chairs for $16-can't beat that with a stick!!  I have taken all the seats off and primed them.  Two of them are green and I am slowly getting them done.  To tell you the truth I am not totally sold on the green.  I really want to paint them all white or black or charcoal-but I know that's the safe thing to do so we'll see.  It's only paint and time, I can always redo them again.

More on those later!
Now the red folding chairs at my table now are outside chairs I brought in when we had friends over last weekend, they looked like this before:
 A few coats of red Krylon spray paint later and.....


  I didn't prime them or sand them-they are outside chairs and that was too much work!!  Just dusted them off and scraped a little loose paint.


-Make your life beautiful!!

Tuesday, June 21, 2011

Pottery Barn Lantern Knock Off---from picture Frames!!!

I have wanted to change the f-ugly light in our bedroom since the day we moved in!
I finally got around to changing it a few weeks ago..I know, I know, I could have shared this idea with you a few weeks ago, but life has been crazy around here!!  The kids are out of school and momma isn't getting her blog on as often!

I made this PB Knock Off Lantern out of old picture frames!!!!


It was inspired by these lanterns from Pottery Barn:
Pottery Barn Gothic Lantern
Pottery Barn Blacksmith Taper Lantern
 The idea came to me on the toilet. No kidding. No, I wasn't going...I was giving Audrey a bath and one of the pictures I had hanging above the toilet fell off and hit me in the back of the head.  The glass broke...this was like the 4th time I had replaced the glass in that one frame.  I was out of donor glass and was a little irritated.  I was looking at it asking myself what to do with them, when it hit me.  No, it another one didn't fall and hit me..I had the idea hit me!

I was going to make a lantern from old picture frames!!

Don't worry I got Audrey out of the bath before I started all this!!

Here's how it was made:

Step 1: Have a picture frame fall on your head Collect 4 matching picture frames.  Mine were 8x10 frames, you can choose smaller or larger-the lantern police won't arrest you for not following directions!

Can you guess which one broke?!? :)


Step 2: Collect your supplies. I used hot glue, gorilla glue, a speed square, needle nose pliers, and painters tape!
Apparently I didn't picture all my supplies-ADD kicking in!
Step 3: Remove all the glass and "guts" of the picture frame and the little metal tabs that hold it all in. (Please note: if you plan to leave the glass in the lantern, you should leave the little tabs in-but I didn't think about that before I removed all mine!)


Step 4: Use your speed square or other 90 degree angle tool to keep it square and put on the Gorilla Glue, then quickly shoot some hot glue on the ends, just to keep it in place.  I'm sure there is an easier way, but I try to look for the hardest way possible and do it that way.  I usually open packages and then find the easy 'pull here to open it' spot!
Sorry it's blurry! 
Step 5:  Repeat step 4 until it looks something like this
Step 6: Tape around the sides with painters tape to keep it together while the glue dries.  When all sides are done, you should have something like this.
Yes, that's the grout stirring paddle in the background!

Step 7: Find some light source to donate it's guts to your new lantern!  I picked this one up from H4H for $5.
Step 8: Forget to take all pictures for the rest of this blog...sorry!
After I took the H4H light apart I attached eyelet screws on the corners of my frame cube and ran chain I had from a previous project (like 3 years ago) from the eyelet screw to the ring on the top of the H4H light.  Spray painted it all black and had it sit for like 2 weeks before I picked up the wire nuts, so Mr. TSL could hang it.


Here is the light that was there before: GAG!!


And Now:


-Make your life beautiful!


Skip to my Lou


Tuesdays:

Adiamond in the Stuff
Coastal Charm

Weekly Parties I Crash

Monday
  craftThe Graphics FairySumo Sweet Stuff Boogieboard CottageBecolorful Making  
Tuesday
PhotobucketStrictly Homemade Tuesday My Uncommon Slice of Suburbia Anything Related LINKPARTYBUTTON
 

Wednesday
a beach cottageDragonfly Designs Creations by KaraThe Trendy Treehouse
NightOwlCraftingShow and Tell Green  

Thursday
giveawaysMy Repurposed LifeTransformation Thursday A Little Knick KnackBeyond The Picket FenceHouseofHepworths
It's a KeeperSuzy's Artsy Craftsy Sitcom  

Friday
Furniture Feature FridaysmonogramBubbly Nature Lovely Crafty HomeTidy Mom I'm Lovin It Fridays Chic on a Shoestring DecoratingCraft GoodiesPhotobucketTickled Pink at 504 Main Designer GardenStuff and Nonsense  
BLOG TITLE


Saturday
Funky Junk's Saturday Nite Special

Sunday
UndertheTableandDreaming The DIY Show Off